Butternut Squash & Chard Lasagna

This month’s issue of Cooking Light is killing it.  Granted, it could be the preggo hormones talking, but I dog-eared almost every single page in the magazine when I got it.

Not that you asked, but here are my general thoughts on Cooking Light:

CL to me = what I imagine Pinterest is to other people.  (Pinterest is far too complicated for me to ever figure out.)  Take the recipe and then add your imagination (and more butter).  Also, I will never use anything but full fat ricotta.  So, of course this “lightened” vegetarian lasagna is really just vegetarian lasagna.  Still, way to go, CL.

IMG_4522

Butternut Squash & Chard Lasagna
  • 3- 4 cups cubed + peeled butternut squash
  • approx 1 cup veggie broth
  • 1 cup milk
  • 5 garlic cloves
  • salt, pepper
  • dash nutmeg (really, small dash – I find nutmeg overwhelming)
  • 1 cup shredded Gruyere/Swiss
  • 1 cup shredded mozzarella
  • 1 onion, chopped
  • 2 boxes mushrooms, sliced
  • 1 big bunch Swiss chard or other leafy green
  • half box no boil lasagna noodles
  • a little less than a cup ricotta cheese
  • parsley
  1. Preheat oven to 375 degrees F.
  2. Combine squash, broth, milk, and garlic in a medium saucepan; bring to a boil. Reduce heat to medium and then simmer until squash is tender (about 20 minutes). Remove from heat.
  3. Place squash mixture in a blender OR – use your immersion blender!! Add salt, pepper, and nutmeg and blend until smooth.   Add the Gruyere and about half the mozzarella to the mixture; stir until it melts all the way in.
  4. Heat a large skillet over medium heat. Add oil to pan; swirl to coat. Add onion and mushrooms; cook about 5-7 minutes or until browned and liquid evaporates. Add chard and a splash of broth. Cover and cook until chard wilts.  Drain the mixture – you want all that excess moisture out of there.
  5. Spread about a cup of the squash sauce in bottom of a glass/baking dish, arrange noodles over the sauce, and top with half of the the chard/mushrooms.  Dollop and spread a bit of ricotta all across.  Then, repeat the process – squash sauce, noodles, chard mixture.  Then, more squash, and finally, mozzarella cheese (and parm, if you feel like it).
  6. Cover with aluminum foil and bake at 375 for 35 minutes.  Uncover and bake another 10 minutes – and then turn the heat up and broil the whole thing for the last 3 minutes.  Serve topped with parsley..and a side salad to cut all that cheese!


IMG_4520

The Verdict:

This is a cheese-fest. Which obviously means it’s an A+ in my book.  Bonus: it makes servings for dayyyyyyys.


Open-faced Grilled Eggplant and Burrata Toast

Because we spent exactly one week bopping about French cafes and chowing down in patisseries, I very badly wanted to call the following recipe “Eggplant Tartine” and get all fancy and French on you.  However, since tartines usually involve some sort of buttery, rich, spreadable topping, and more importantly, since Husband actually executed this recipe and would definitely not prefer to be known as the tartine-man, I will settle for calling these “open-faced.”  (Note, though, in the picture below that I did bring back a cheesy Paris metro map placemat, much to the Husband’s chagrin.)

You could substitute burrata for some sort of smoky gouda or mozzarella and really amp up the flavor here.

IMG_3830

Open-faced Grilled Eggplant and Burrata Toast

  • 1 eggplant, sliced about 1/2 inch thick
  • olive oil
  • salt, pepper
  • 2 cloves garlic, minced
  • 1 tablespoon butter
  • 1 ball burrata
  • 2-3 tomatoes, sliced
  • 1 big handful fresh basil
  • handful arugula
  • thick sliced toast or bread
  1. Heat a grill pan over medium heat and spray with a little cooking spray.
  2. Melt butter and garlic together in a microwave; brush the mixture over the eggplant slices.  Season with salt and pepper and grill the egglplant about 3-4 minutes per side.  (You can grill your tomatoes, too, for extra points.)
  3. Meanwhile, toast your bread and brush with any remaining butter/garlic.  Place the burrata over the warm bread so that it melts, top with eggplant, tomatoes, basil and a little bit of arugula.  Drizzle with olive oil and season as appropriate.  Serve with a side salad.

IMG_3825

The Verdict:

A few reasons you should make these.  1: They’re ridiculously easy (see: Husband made these). 2. They take about 20 minutes, total.  3. They’re delicious.  Like, really, really good.

Mozzarella and Sundried Tomato-Stuffed Chicken

We are home.  And we are stuffed.

For the past week, we have eaten nothing but baguettes, cheese, croque madame, pain au chocolat, croissants, steaks and frites.  We have consumed bottle after bottle of champagne and red wine.  We bought ice cream cones for the express purpose of passing the time, standing in line for museums.  We were gluttons and we are not sorry.

Paris and London were in a word, amazing.  We climbed all the monuments (sort of atones for the food? maybe?).  We took boat tours down the Thames and the Seine, and toasted each other as the Eiffel Tower lit up the sky.  We looked at crowns and wandered through gardens.  We saw close friends and family; I wandered the grand flower store at the foot of our old apartment, where my father took me the day I turned 8 and let me pick out any flowers I wanted for a birthday bouquet.

We are stuffed – food-wise, but also joy-wise.  (I know, I’m cheesy, but it’s just the truth.)  In that honor, some stuffed chicken breasts I made before we left.

IMG_3447

Mozzarella and Sundried Tomato-Stuffed Chicken Breasts

  • 1 pound boneless, skinless chicken breasts, rinsed and patted dry
  • salt, pepper
  • 1 large ball mozzarella, thinly sliced
  • large handful fresh basil
  • 2 tablespoons or so sundried tomatoes, julienned
  • about 2 cups flour
  • 2 eggs, lightly beaten with a dash of water
  • about 2 cups panko breadcrumbs
  • olive oil
  1. After you rinse and pat dry chicken breasts, rub with a little bit of olive oil and generously season with salt and pepper.  Use a small knife to carefully make an incision in each chicken breast; take care not to cut it all the way in half (you want to create a little pocket for all your goodies).
  2. Place each chicken breast under a sheet of parchment and pound with a mallet or small pan.so they are each less than an inch thick.  Insert a layer of basil, mozzarella and a few sundried tomatoes into each “pocket” of the chicken breast.
  3. Dredge each chicken breast individually in the flour, shake off excess flour, coat in the beaten eggs, and then dredge in panko.  Repeat for each chicken breast.
  4. In a large saute pan, heat olive oil over medium heat.  Without crowding the pan, cook each chicken breast for about 3-4 minutes on one side.  Lower the heat and use tongs to carefully flip to the other side, cooking an additional 3-4 minutes.  Keep chicken warm while you cook the additional breasts.
  5. Serve with a side salad and some crusty bread.

The Verdict:

This is a go-to in our house: that panko crust keeps the chicken juicy and crispy at the same time, while the cheese just oozes on to your plate.  And no one argues with oozing cheese.

Sausage and Veggie Calzones

Tomorrow, Husband and I are jetting off on a very big vacation.  For me, vacation means eating, drinking, and eating some more.  Husband is a little more taken with hiking and outdoor things.

However.  This vacation is my kind of vacation.  Destination: London and Paris.  In other words, by this time tomorrow, I will be chowing SO MANY baguettes.  (OK, to be technical, by this time tomorrow I will be drinking wine courtesy of Virgin Airlines.  But I digress).

Of course, we had to practice our eating, so last night, I made these calzones.  Just to forewarn: this is quite an endeavor – almost two hours.  But this recipe makes so many that unless you’re a member of the Duggar clan (YIKES), you’ll have leftovers, which you can freeze.  Which we have, and will eat the second we get off our return flight to DC.

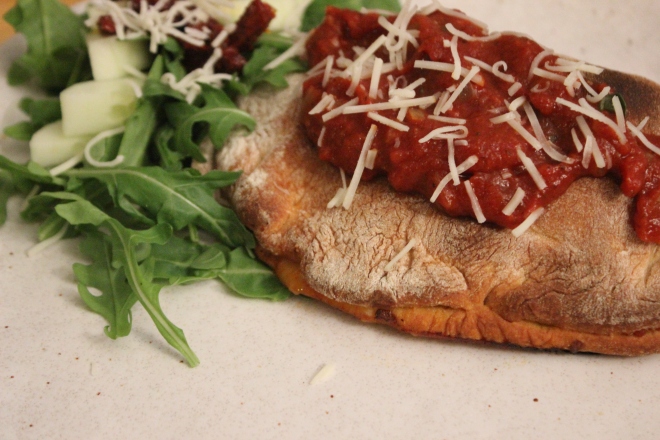
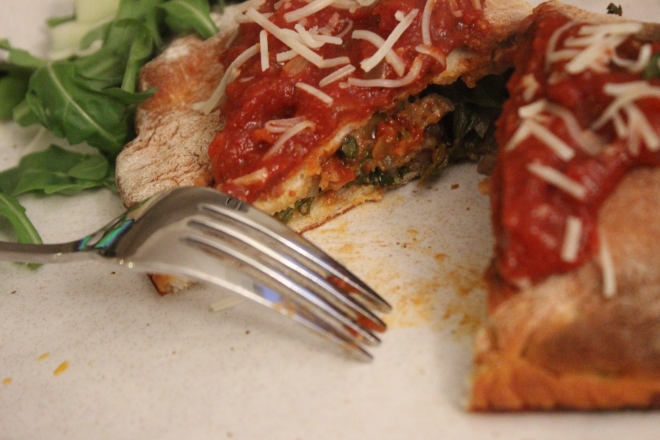
IMG_3460

Sausage and Veggie Calzones

  • 2 pounds premade pizza dough, brought to room temperature
  • olive oil
  • 2 tablespoons tomato paste
  • 3-4 cloves garlic, minced
  • 1 large onion, chopped and divided in half
  • 1 28 oz can crushed tomatoes
  • salt, pepper, crushed red pepper
  • 1 teaspoon sugar
  • large handful fresh basil
  • 8-10 sprigs fresh thyme
  • about a pound (4 or so links) hot Italian sausage
  • 1 bell pepper, diced
  • shredded mozzarella cheese
  • about half a pre-washed bag of arugula
  1. Heat a medium saucepan over medium heat and add olive oil.  Add half of the diced onion, cook down a few minutes before adding garlic and tomato paste.  Cook down another few minutes and add tomato, salt, pepper, crushed red pepper, and sugar.  Stir together and cook for about ten minutes.  Add basil and thyme and keep the sauce warm over low heat.
  2. As the sauce cooks, prepare your filling.  Heat a large skillet over medium heat, add olive oil and the other half of your diced onion.  Cook down a few minutes and add bell pepper, salt, pepper and some crushed red pepper (after all, we like it spicy around here).  Cook for a few minutes before removing sausage from casings; make sure to break it up in the pan.  Cook until the meat is completely brown.
  3. Divide your (room temp!) dough into eight sections and roll each out on a lightly floured surface – so they’re about 6 inches across and as close to round as they’ll get.  Let’s be honest: this is the hardest step.  Because my kitchen is tiny, I found it helpful to layer the rolled out rounds on a plate between sheets of parchment paper.
  4. Preheat oven to 450 degrees F.  Line two baking sheets with parchment paper and assemble the calzones: top each pizza dough round with a layer of sauce, sausage mixture, a sprinkling of mozzarella, and a small pinch of arugula.  Fold over and crimp the edges of the calzone together.
  5. Bake at 450 degrees F for 25 minutes and serve with an additional spoonful of sauce (and some salad, let’s keep it healthy!).  If you want to freeze any calzones – pull them out at the 15 minute mark, let them cool completely, and then wrap in aluminum foil before placing in a ziplock bag in your freezer.  To reheat, bake the frozen calzones at 400 degrees F for 20 minutes.

IMG_3462

The Verdict:

We love our calzones/stromboli around here – the Husband is a pro.  But as he carefully admitted last night, “these gave [his calzones] a run for his money, and that money is still running.”

PS: I won’t be posting for the next week or so.  There are just TOO MANY baguettes to chow!

Shaved Asparagus Pizza

Even though I am a terrible food blogger and have not cooked one thing for approximately two weeks now (something both my wallet and my waistband are complaining about), my offering to the interwebs today is this simple, delicious pizza the Husband made me over two weeks ago.  Better late than never, right?

Inspired by Smitten Kitchen, tweaked Chez Nous.

IMG_3392

Shaved Asparagus Pizza

  • 1/2 bunch asparagus
  • olive oil
  • salt, pepper, crushed reds
  • 1 (prepared) pizza dough – we used Trader Joe’s! – plus a little bit of flour for rolling the dough
  • 1/2 cup grated Parmesan and/or Gruyere
  • about a cup cherry tomatoes, halved
  • 5-6 small balls fresh Mozzarella, cut in half
  • 1 bunch scallions, chopped
  1. Preheat the oven to 500 degrees.
  2. “Shave” the asparagus by holding by their (untrimmed) ends against a flat cutting board and running a sharp vegetable peeler across the spear.  Repeat until you have a nice little pile of asparagus shavings, and then toss them in a small bowl with olive oil, and a pinch each of salt, pepper, and crushed red pepper.
  3. Roll out the pizza dough on a light floured surface; sprinkle a bit of the flour on the bottom of your baking sheet (or pizza stone, if you’re fancy) and then transfer the dough to the sheet.  Spread a mixture of the cheeses over the surface, top with asparagus and with cherry tomatoes.  Drizzle with a little olive oil if you like, and then pop the pizza in the oven for 10-15 minutes, or until edges are browned and the cheese is bubbly.
  4. Top with scallions – the more the merrier – and if you like, fresh herbs, arugula, a poached, egg, whatever your heart desires.

The Verdict:

This is so simple, and yet, so good.  It even feels like it’s good FOR you (which it might be, had we not smothered it in cheese).  It’s sort of like the scallion situation I described above: the more cheese, the merrier.  Obvi.