French Onion Mac + Cheese

Probably exactly what you need, right after the new year starts, is a recipe that combines two of the most wonderful, cheese and carb-laden treats known to humankind into one unholy meal.

Well, I can say that at least around here, “losing x pounds” didn’t make it to the resolutions list this year.  #pregnancyperks

I won’t lie to you: this recipe takes a while (about 2.5 full hours, from start to finish).  BUT, it’s worth it.  And not just if you’re pregnant.  So let’s get to it.

French Onion Mac + Cheese

IMG_4262.JPG

for the bechamel

  • 4 tablespoons butter
  • 4 tablespoons flour
  • 2 cups milk (or cream, if you’re into that sort of thing)
  • salt & pepper
  • crushed reds
  • 2 cups grated Gruyere
  • 1/2 cup sharp cheddar

for the onion mixture

  • butter/olive oil
  • 3 large yellow onions, sliced
  • 6-8 cloves garlic, minced
  • a dash of honey
  • salt & pepper
  • 1 cup dry white wine
  • 2 cups beef stock (to make this veggie, obviously, just use veggie stock instead.)
  • 12 sprigs fresh thyme (you might want to tie these up into a bundle)
  • 1 bag arugula
  • 1 box pasta (I used cavatappi, which winds its way so delightfully around each onion slice, each delightful bite of cheese)

for the topping

  • about 1/2 cup panko
  • about 1/2 cup parmesan
  • (a little parsley, if you have it, would be nice right at the very end)
  1. Start your onions, which take the longest.  Heat a bit of butter and olive oil in a large Dutch oven.  Add onions, cover, and cook down, stirring frequently, for 15 minutes.
  2. While the onions are going, start your bechamel.  Over low heat, melt the 4 tablespoons of butter in a medium saucepan; add flour and stir constantly to combine for 2-3 minutes.   Increase heat to medium, and slowly add the milk or cream; stir until thickened (this takes about 5-6 minutes; add more flour if you need).  Lower the heat, & season with s+p and the crushed red peppers.  Fold in the gruyere and cheddar until the sauce is melty and delicious – set aside and try not to eat.
  3. To the onion mixture, add garlic and dash honey.  Cook another 15 minutes, stirring frequently, until the onions start to caramelize.  Add wine and beef broth and stir, scraping up the bottom bits.  Add the thyme and let the mixture cook down, until the liquid is almost gone.
  4. The previous step will take a while, so this is is a good time to start your pasta water boiling and to cook according to directions.  Drain and set aside when done.
  5. Preheat the oven to 350 degrees F.  Grease a baking pan.  In the onion pot, mix together the arugula, pasta, onions, and bechamel.  Make sure it’s thoroughly combined before you pour into the baking pan – snag the bundled thyme as you do so.
  6. In a small bowl, toss together the panko and parmessan, and then spread this over the top of the pasta/onion mixture.  Pop the whole thing into the oven for 35 minutes.
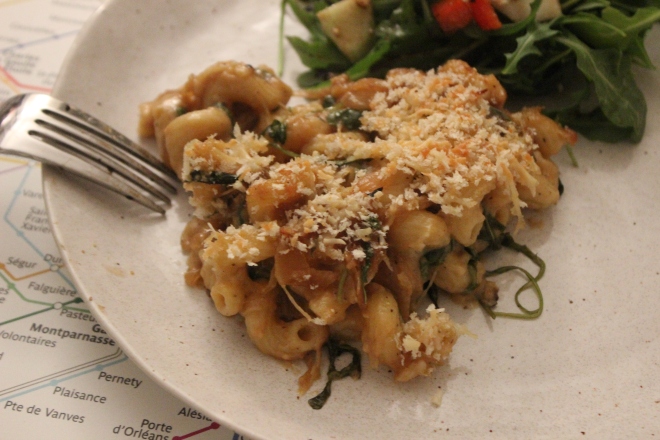
IMG_4265.JPG

The Verdict:

You can taste how long this takes to make (in a good way, I promise).  It’s got serious flavor, from first bite to finish.  It’s two of the best meals ever, on one plate – how could you not love it?  Just make sure to serve with a side salad – you’ll want something a little…lighter.


Apple and Cheese Curd Scones

My sister came to visit last weekend from Minneapolis (key player in gathering of the 32.8 pounds of apples).  Just before she boarded her plane, she texted my husband and me that she was bringing a special surprise.

Of course, we should have responded that her visit was special enough and yada yada.  Which of course we didn’t do.  Almost in unison, Husband and I texted back: “Jucy Lucys!?!?”

These are the kind of people we are.  We assume that bringing a burger stuffed with hot, melty cheese  across state lines is perfectly normal.  My sister kindly noted that these probably wouldn’t be delicious by the time she arrived, but promised she was bringing something equally tasty.

Holy (bag of) cheese curds.  My sister knows me all too well.  We adapted a Smitten Kitchen recipe and made a (small) dent in our 32.8 pounds of apples.

IMG_4106Apple and Cheese Curd Scones

  • 3-4 tart apples, peeled, cored and cut into chunks/slices
  • 1 1/2 cups all-purpose flour
  • 1/4 cup sugar plus a bit for sprinkling
  • 1/2 tablespoon baking powder
  • 1/2 teaspoon salt
  • 6 tablespoons chilled, unsalted butter, cut into small cubes
  • bag of Minnesota cheese curds…or about a cup of grated cheddar cheese
  • 1/4 cup heavy cream
  • 2 large eggs

**NOTE: We doubled the recipe (single recipe listed here)…which I don’t really recommend, unless you have a standing-bowl mixer or a very, very large food processor.  It made the dough sort of hard to manage.

  1. Position a rack at the center of oven and preheat oven to 375 °F. Line baking sheet with parchment paper.
  2. Placed peeled and chunked apples in a single layer on a baking sheet lined with parchment paper and bake them until they take on a little color and feel dry to the touch, about 20 minutes. . Let them cool completely but leave oven on.
  3. Whisk flour, sugar, baking powder and salt together and set aside. Place butter in the bowl of an electric mixer with a paddle attachment, along with cooled apple chunks, cheese, cream and one egg. Sprinkle flour mixture over the top and mix on low speed until the dough just comes together. Do not overmix (you may need to get handsy here, as we did.  This dough can be sort of gloppy and wet.)
  4. Generously flour your counter top and place the scone dough on top of it, sprinkle with more flour.  Use a rolling pin (you may want to actually cover the dough with saran wrap, to minimize stickiness) to roll the dough out.  Use a glass or circular cookie cutter to cut the dough into cookie-like scones.
  5. Transfer cookie/scones to a baking sheet ined with parchment paper. Leave at least 2 inches between each scone.
  6. Make your egg wash: beat remaining egg in a small bowl with a pinch of salt. Brush the scones with egg wash and sprinkle them with remaining tablespoon of sugar.
  7. Bake scones at 375 for about 30 minutes. Devour.

IMG_4046The Verdict:

These scones/cookies/whatever they are…they’re amazing.  Amazing.  The dough, which seems so unpromising, turns into the perfect combination of savory, sweet, and just…carby goodness.  Good thing they’re so deliciously addictive: they get less flaky as the days wear on, so feel free to eat them all up, and quickly (we stored about six, unbaked, in the freezer.  SERIOUSLY looking forward to them.)

Villa Pasta

I did not want to graduate from college.  College = three years (because the first one was a bust) of nonstop hanging out with my friends, beers on a Tuesday night, and late night pizza with ranch dressing.  What could be better?

Answer: Graduating, and recreating my college experience in an apartment building two miles from my university.  Only this time, I had a little bit of money in my pocket and no homework.  Plus I started (not so secretly as we imagined) dating my future Husband.

Unfortunately, post-college college life was only relevant Friday through Sunday.  In order to stave off Monday mornings, future-and-now-current husband, his roommate, my roommate (still one of my BFFs and now married to Husband’s BFF, life is grand) and I used to get together for “family dinners” on Sunday evenings.  Because a few bottles of wine will definitely make Monday feel a lot better.

My roommate had “studied” abroad in Florence, where she learned from her hosts at the Villa how to make this ridiculous pasta.  At the time of family dinner, it was the best thing any one of us could ever imagine making.  It is still ridiculously good.  Only last night, I added a few “healthy” things.  Because now that I’m old, I top my pizza with extra veggies instead of ranch dressing.  I am not nearly as cool as I was once.

IMG_3809

Villa Pasta

  • 1 large onion, chopped
  • about 5 tablespoons olive oil
  • about 3 tablespoons butter
  • 1 can (15 oz) crushed tomatoes
  • 1 tablespoon tomato paste
  • 1 carton cherry tomatoes, sliced
  • s+p
  • one small handful crushed red pepper
  • handful basil, chopped
  • 1 carton mushrooms, sliced
  • 1/2 bag pre-washed spinach
  • freshly ground pepper
  • approximately 1/2 cup heavy cream
  • 1 cup grated Swiss cheese (I used mozz, but I PROMISE it’s better with Swiss)
  • 1 pound rigatoni or other tubular pasta
  1. In a large, deep skillet, heat olive oil and butter.  Cook onions for about 20 minutes, stirring occasionally to prevent onions from burning.
  2. When lightly browned, add both forms of tomatoes, tomato paste, basil, crushed red pepper, salt and pepper.  Give it a toss and then cook, covered, for 25 minutes over low/medium heat. Toward the end of the 25 minutes, get (salted) water boiling for your pasta.
  3. Add mushrooms and spinach, recover, and cook for another 5-8 minutes, or until mushrooms have cooked through.  Cook your pasta in the meantime.
  4. Add cream to the sauce and adjust seasoning.  Toss hot pasta with sauce and cheese.

The Verdict:

I forgot how long this pasta takes – nearly an hour, all said and done.  But jeez louise, it is still the best thing ever.  Seriously.  Try it.  Love it.  Tell me about it.

Pancetta & Leek Quiche

I know, I can’t stop posting about quiches and tarts and things that are technically veggie oriented but are really just carbo-loaded vehicles for cheese consumption.  Guilty as charged.

On the other hand, when the Husband told me this was “the best ever,” obvi it’s going on the blog.  Sorry I’m not sorry.

IMG_3278
how does this end up looking like a pizza?!

Pancetta & Leek Quiche

  • 1 premade pie dough, brought to room temperature
  • about 4 oz diced pancetta
  • 4 large leeks, white and light green parts only, thinly sliced
  • salt, pepper, crushed red pepper
  • about 2-3 tablespoons chopped fresh parsley
  • 4 eggs
  • 1 cup or so heavy cream (or milk, or half and half, or whatever you have)
  • about 8 oz shredded Gruyere
  • optional: handful cherry tomatoes, halved, chopped green onions
  1. Preheat the oven to 375 degrees F.  Unroll the pie dough and press into a pie plate.  Prick lightly with a fork and bake for about 5-6 minutes, just to get the color nice and light golden.  Bonus if you can use a  crust protector.
  2. In a saute pan, over medium high heat, cook the pancetta until it starts to crisp up.  Reduce heat to medium low, and in that nice bacon-y fat, add your sliced leeks.  (Note: it will look like a LOT of leeks.  Don’t worry – they’ll all fit!).  Add salt, pepper, crushed reds, and parsley and let the leeks cook down a good while – about 10-12 minutes, until they’re nice and translucent.
  3. Meanwhile, in a separate bowl, whip together eggs, cream, and a pinch of salt/pepper/crushed reds.
  4. In your (lightly) baked pie dough, spread the bacon and leek mixture evenly.  Top with a generous amount of cheese, and then carefully pour the egg/cream mix over the top.  Top, as desired, with cherry tomatoes for an extra pop of color.
  5. Bake for about 30-35 minutes, or until the crust is nice and golden, and the eggs are cooked all the way through.  Top with additional parsley and serve with a side salad.
IMG_3281
less pizza, more leek.

The Verdict:

I think we already established the Husband’s verdict.  As for me, any day I get to use the crust protector, that’s a good day.

Roasted Salmon with Horseradish and Homemade Dill Creme Fraiche

All of the Safeway grocery stores in DC have an alliterative descriptor, ranging from the innocuous to the offensive.

There’s the Social Safeway up in Georgetown (also sometimes known as the Single Safeway), where it’s rumored you can pick up a date (it’s also just the closest Safeway to the Georgetown campus).  There’s the (former) Secret Safeway, which no one could ever find – (now a ridiculously delicious small-batch grocery store; if you visit DC, you must eat their kale slaw).  There’s the Senior Safeway, located by the Watergate, where some of our more…experienced citizens live.

And there’s the Safeway closest to us, not-so-affectionately known as the Soviet Safeway.  This nickname is based on two primary reasons: 1. its inability to stock fresh bread and anything but the most wilted of vegetables; and 2. its obscenely long lines.

All of this is a (very long) say of saying I don’t buy fresh fish often.  The Husband loves this, as he’s just not into fish.  As someone who negotiates with my sister for the last piece of lox, I feel differently.

This salmon (not from Safeway) was amazing – recipe based on Cooking Light‘s.  It takes a while – but none of it is hands-on; make it the night before, spend a few quick minutes before you leave for work in the morning, and it’s ready in 20 minutes after you get home.  I promise it will make for a very fiesta-y Friday.

IMG_3264

Roasted Salmon with Horseradish and Homemade Dill Creme Fraiche

**if you want enough creme fraiche to adequately feed more than 2 people, would suggest doubling the ingredients starting with heavy cream going through s&p**

  • 1/4 cup heavy cream
  • 1 1/2 teaspoons buttermilk
  • 1 teaspoon white vinegar
  • 2 tablespoons chopped fresh dill (about 3-4 sprigs)
  • salt & pepper
  • 2-3 big tablespoons prepared horseradish
  • 2-3 tablespoons fresh parsley, chopped
  • 2-3 small shallots, finely chopped
  • 2 tablespoons capers, drained
  • 2-3 tablespoons olive oil
  • about 1 pound salmon (this is enough for 2 people, with leftovers for lunch)
  1. Prepare creme fraiche: before you go to bed, combine cream, buttermilk and vinegar in a small bowl.  Cover with plastic wrap and leave at room temperature, about 8 hours.  When you wake up, add the dill, about 1/8 teaspoon each of salt and pepper.  Cover again and refrigerate, about 8-12 hours.  You’ll have a lovely, tangy sauce when you get home from work.
  2. Prepare horseradish “marinade:” combine a pinch of salt, pepper, horseradish, parsley, shallots, capers and olive oil in a small bowl.  Mix thoroughly, and then spread over the salmon fillets.  Cover and refrigerate, about 8-12 hours.
  3. Cook fish: preheat the oven to 450 degrees.  Place fish (skin side down) on a baking sheet lined with parchment paper.  Roast for about 12-15 minutes, or until done.  Serve with creme fraiche and a side of simple, roasted asparagus (which magically takes the same amount of time as the fish!).

IMG_3271

The Verdict:

The Husband cleaned his plate.  I nearly licked mine.  Pack any leftover fish with a bit of spinach and a dollop of the sauce, and have yourself a merry little lunch.  Also: when was the last (or any, in my case) time you made your own creme fraiche!?  There’s something that’s definitely not stocked at our Safeway.